When speaking of Change Data Capture, Debezium and Kafka connect are the first tools that comes to our mind. Though you are missing out on a great gem if you haven’t heard of Canal.
Canal is an open-source project developed by Alibaba that provides real-time data synchronization and Change Data Capture (CDC) capabilities.
Why should you use Canal?
I have encountered a lot of issues when working with Debezium and Kafka Connect. Here are some of those issues:
- Long snapshot process duration : Debezium and Kafka Connect take a long time to take a snapshot of the database. It has to read all the data from the source database, convert it into a json format, and then produce it to Kafka. Then the consumer has to read the data from Kafka and write it to the target database. This process can take a long time depending on the size of the database.
- Unsupported MySQL data types : Debezium and Kafka Connect do not support all MySQL data types. We have encountered errors with
enumandJSONcolumns. - Complex configuration : Debezium and Kafka Connect require a lot of configuration to set up.
Then, I have found Canal to be a great alternative which solves all these issues. Canal has many usecases and is very flexible:
Application Scenarios: Canal ‘s data synchronization is not full, but incremental (do not worry, we will find a way around this to support both full and incremental data synchronization). It use database incremental log parsing technique, then provides incremental data subscription and consumption:
- Database mirroring and migration
- Real-time database backup
- Index building and real-time maintenance
Specific business scenarios:
- Data synchronization, such as data synchronization between online and offline databases;
- Data consumption, for example, the need to perform search increments based on changes in the database table of interest;
- Data desensitization, for example: online dynamic data needs to be imported to other places for data desensitization.
Canal Working Principle
Before talking about Canal’s working principle, let’s first understand how MySQL replication works.
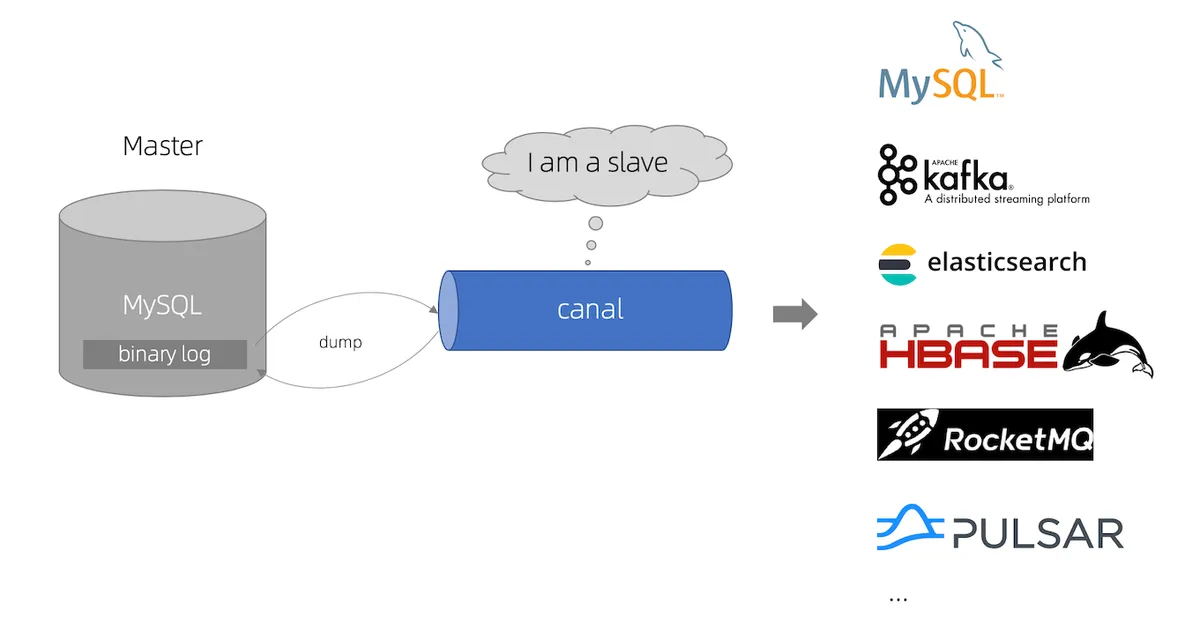
MySQL replication is a process that allows data from one MySQL database server (the master) to be copied to one or more MySQL database servers (the slaves). MySQL replication is based on the binary log, which is a log file that contains all changes to the database. The master writes data changes to the binary log, and the slave copies the binary log events and replays them to change the data to reflect the changes.

Canal disguise itself as a MySQL slave. It connect to the MySQL Master and requests the binary log file together with the log position to start replication. Canal then starts to parse the binary log and sends the data changes to the downstream consumers.

Components of Canal
Canal consists of three main components:
- Canal Deploy: It can be regarded as a canal server. It is responsible for pretending to be a MySQL slave, receiving, parsing binlogs and delivering (without processing) to the specified target end (RDS, MQ or canal adapter)
- Canal Adapter/Client: This is the client adapter of Canal, which can be regarded as canal client. It can directly write the data synchronized by canal to the target database: habase, elastic search,
rdb. RDB is a relational database such as MySQL, Oracle, PostgresSQL and SQLServer. - Canal Admin: Provides canal with operation and maintenance functions such as overall configuration management and node operation and maintenance, also provides a relatively friendly WebUI operation interface to facilitate more users to operate quickly and safely.
Installation and Configuration
Preqrequisites
Enable Binary Log in MySQL
If your database doesn’t have binary logs enabled, you need to add the following configuration to the MySQL configuration file (my.cnf):
[mysqld]server_id=1log_bin=mysql-binbinlog_format=rowAfter adding the configuration, restart the MySQL server:
sudo systemctl restart mysqlGrant Replication Privileges
Canal needs to have replication privileges to read the binary logs. Create a user on the source database with the following privileges:
CREATE USER 'canal'@'%' IDENTIFIED BY 'canal';GRANT SELECT, REPLICATION SLAVE, REPLICATION CLIENT ON *.* TO 'canal'@'%';FLUSH PRIVILEGES;Database Snapshot and Binlog Position
Because Canal only supports incremental data synchronization based on binlog position. Therefore, we need to take a snapshot of the database to get the initial data and get the binlog position of the snapshot:
mysqldump -uroot ${MYSQL_DUMP_DATABASES} --master-data=2 --flush-logs --single-transaction --skip-lock-tables --set-gtid-purged=OFF > ${DUMP_PATH} -pThe --master-data=2 option will add the CHANGE MASTER TO statement to the dump file providing the binlog file and position. Because of the big size of the dump file, we can use this command to get the binlog position:
grep "CHANGE MASTER TO" ${DUMP_PATH}Example output:
-- CHANGE MASTER TO MASTER_LOG_FILE='mysql-bin.000020', MASTER_LOG_POS=197;From this, we can see that the binlog file is mysql-bin.000020 and its position is 197.
Then we can process to restore the dump file to the target database:
mysql -uroot -p < ${DUMP_PATH}Install Canal Server
You can download the Canal server archive from their Github Github release page
wget https://github.com/alibaba/canal/releases/download/canal-1.1.7/canal.deployer-1.1.7.tar.gztar -xvf canal.deployer-1.1.7.tar.gzNote (Note)
Make sure your system has Java 8 or higher installed. Canal also provides a Docker image that you can use to run the Canal server.
After extracting the archive, you will get the following directory structure:
canal-server├── bin├── conf├── lib├── logs└── pluginCanal server configuration is located in the conf directory. The main configuration files are canal.properties and instance.properties files:
# tcp, kafka, rocketMQ, rabbitMQ, pulsarMQcanal.serverMode = tcpIn the canal.properties file, you can specify the server mode. Canal supports multiple server modes such as tcp, kafka, rocketMQ, rabbitMQ, and pulsarMQ. In this case, we are using the tcp mode.
canal.instance.gtidon = false # Whether to enable GTID modecanal.instance.master.address = 127.0.0.1:3306 # MySQL master addresscanal.instance.master.journal.name = mysql-bin.000020 # Binlog file namecanal.instance.master.position = 197 # Binlog positioncanal.instance.master.timestamp=canal.instance.master.gtid=canal.instance.dbUsername = canalcanal.instance.dbPassword = canalcanal.instance.filter.query.dml = truecanal.instance.connectionCharset = UTF-8canal.instance.enableDruid = falsecanal.instance.filter.regex = database_1\..*|database_2\..*canal.instance.filter.black.regex=mysql\.slave_.*In the instance.properties file, we will specify the MySQL master address, binlog file name, binlog position that we got from the database snapshot, and the user credentials Canal will use to connect to the MySQL master. The canal.instance.filter.regex property is used to specify the databases and tables to be synchronized. In this case, we are synchronizing all tables in database_1 and database_2 databases.
To start the Canal server, run the following command:
sh bin/startup.shCheck the logs to see if the Canal server has started successfully:
[root@canal example]# tail -f example.log2024-06-24 16:53:40.037 [main] INFO c.a.otter.canal.instance.spring.CanalInstanceWithSpring - start CannalInstance for 1-example2024-06-24 16:53:40.052 [main] WARN c.a.o.canal.parse.inbound.mysql.dbsync.LogEventConvert - --> init table filter : ^database_1..*|database_2..*$2024-06-24 16:53:40.053 [main] WARN c.a.o.canal.parse.inbound.mysql.dbsync.LogEventConvert - --> init table black filter : ^mysql.slave_.*$2024-06-24 16:53:40.058 [main] INFO c.a.otter.canal.instance.core.AbstractCanalInstance - start successful....2024-06-24 16:53:40.201 [destination = example , address = /10.50.69.60:3306 , EventParser] WARN c.a.o.c.p.inbound.mysql.rds.RdsBinlogEventParserProxy - ---> begin to find start position, it will be long time for reset or first position2024-06-24 16:53:40.201 [destination = example , address = /10.50.69.60:3306 , EventParser] WARN c.a.o.c.p.inbound.mysql.rds.RdsBinlogEventParserProxy - prepare to find start position mysql_bin.000020:197:null2024-06-24 16:53:40.222 [destination = example , address = /10.50.69.60:3306 , EventParser] WARN c.a.o.c.p.inbound.mysql.rds.RdsBinlogEventParserProxy - ---> find start position successfully, EntryPosition[included=false,journalName=mysql_bin.000020,position=197,serverId=<null>,gtid=,timestamp=<null>] cost : 0ms , the next step is binlog dump
Install Canal Adapter
After starting the Canal server, we need to install the Canal adapter to consume the data changes from the Canal server and write them to the target database.
Download the Canal adapter archive from the release page
wget https://github.com/alibaba/canal/releases/download/canal-1.1.7/canal.adapter-1.1.7.tar.gztar -xvf canal.adapter-1.1.7.tar.gzJust like the Canal server, the Canal adapter configuration is located in the conf directory.
conf├── META-INF├── application.yml├── bootstrap.yml├── es6├── es7├── es8├── hbase├── kudu├── logback.xml├── rdb└── tablestoreAs we can see, the Canal adapter supports multiple target databases such as es6, es7, es8, hbase, kudu, rdb, and tablestore. In this case, we are using the rdb target database. Now let’s configure the application.yml file as it is the main configuration file for the Canal adapter:
server: port: 8081spring: jackson: date-format: 'yyyy-MM-dd HH:mm:ss' time-zone: GMT+7 default-property-inclusion: non_nullcanal.conf: mode: tcp flatMessage: true zookeeperHosts: syncBatchSize: 500 retries: -1 timeout: accessKey: secretKey: consumerProperties: canal.tcp.server.host: '127.0.0.1:11111' canal.tcp.zookeeper.hosts: canal.tcp.batch.size: 500 canal.tcp.username: canal.tcp.password: canalAdapters: - instance: example groups: - groupId: g1 outerAdapters: - name: logger - name: rdb key: database_1 properties: jdbc.driverClassName: com.mysql.jdbc.Driver jdbc.url: jdbc:mysql://127.0.0.1:3306/database_1?useUnicode=true&useSSL=false jdbc.username: root jdbc.password: 'secure_password' druid.stat.enable: false druid.stat.slowSqlMillis: 1000 - name: rdb key: database_2 properties: jdbc.driverClassName: com.mysql.jdbc.Driver jdbc.url: jdbc:mysql://127.0.0.1:3306/temporal_visibility?useUnicode=true&useSSL=false jdbc.username: root jdbc.password: 'secure_password' druid.stat.enable: false druid.stat.slowSqlMillis: 1000The configuration is pretty self-explanatory. We are specifying the Canal server host and the target database connection details for the adpater to connect to. Next, we need to configure how we want each database or table to be synchronized. Let’s add two files in the rdb directory: database_1.yml and database_2.yml:
dataSourceKey: defaultDSdestination: examplegroupId: g1 # This should match the groupId in the application.yml fileouterAdapterKey: database_1 # This should match the key in the application.yml fileconcurrent: truedbMapping: database: database_1 mirrorDb: true # Whether to mirror the database mapAll: true # Whether to map all tables commitBatch: 500 # Batch submission sizePhew! That’s a lot of configuration. But don’t worry, it’s not as complicated as it looks. The Canal adapter is very flexible and can be configured to suit your needs. Now let’s start the Canal adapter:
sh bin/startup.sh
Verify Data Synchronization
Insert data to source database:
mysql> use database_1;Reading table information for completion of table and column namesYou can turn off this feature to get a quicker startup with -A
Database changedmysql> insert into person(id,name) values(3,'test 1');Query OK, 1 row affected (0.00 sec)
mysql> insert into person(id,name) values(4,'test 2');Query OK, 1 row affected (0.00 sec)Check canal adapter logs to see if the adapter has received the data changes from the Canal server
[root@canal-temporal adapter]# tail -f adapter.log[2024-06-24 17:07:53.285 [pool-14-thread-1] INFO c.a.o.canal.client.adapter.logger.LoggerAdapterExample - DML: {"data":[{"id":3,"name":"test 1"}],"database":"database_1","destination":"example","es":1719223671000,"groupId":"g1","isDdl":false,"old":null,"pkNames":["id"],"sql":"","table":"person","ts":1719223672972,"type":"INSERT"}2024-06-24 17:07:53.347 [pool-5-thread-1] DEBUG c.a.o.canal.client.adapter.rdb.service.RdbSyncService - DML: {"data":{"id":3,"name":"test 1"},"database":"database_1","destination":"example","old":null,"table":"person","type":"INSERT"}2024-06-24 17:07:56.359 [pool-14-thread-1] INFO c.a.o.canal.client.adapter.logger.LoggerAdapterExample - DML: {"data":[{"id":4,"name":"test 2"}],"database":"database_1","destination":"example","es":1719223675000,"groupId":"g1","isDdl":false,"old":null,"pkNames":["id"],"sql":"","table":"person","ts":1719223676359,"type":"INSERT"}2024-06-24 17:07:56.365 [pool-6-thread-1] DEBUG c.a.o.canal.client.adapter.rdb.service.RdbSyncService - DML: {"data":{"id":4,"name":"test 2"},"database":"database_1","destination":"example","old":null,"table":"person","type":"INSERT"}
Check the target database to see if the data has been synchronized:
mysql> use database_1;Reading table information for completion of table and column namesYou can turn off this feature to get a quicker startup with -A
Database changedmysql> select * from person;+----+--------+| id | name |+----+--------+| 1 | alice || 2 | bob || 3 | test 1 || 4 | test 2 |+----+--------+4 rows in set (0.00 sec)Voila! The data has been successfully synchronized from the source database to the target database.
Check Replication Status
To check how far Canal has replicated the data, you can check the meta.log file in the logs directory of the Canal server:
[root@canal-temporal canal-server]# cd logs/example/[root@canal-temporal example]# tail -f meta.log[root@canal example]# tail -f meta.log2024-06-24 17:07:54.048 - clientId:1001 cursor:[mysql_bin.000020,474,1719223671000,24555710,] address[/10.50.69.60:3306]2024-06-24 17:07:57.047 - clientId:1001 cursor:[mysql_bin.000020,782,1719223675000,24555710,] address[10.50.69.60/10.50.69.60:3306]Then compare it with the binlog position of the MySQL master:
mysql> show master status;+------------------+----------+--------------+------------------+---------------------------------------------+| File | Position | Binlog_Do_DB | Binlog_Ignore_DB | Executed_Gtid_Set |+------------------+----------+--------------+------------------+---------------------------------------------+| mysql_bin.000020 | 813 | | | a02dca4f-1d85-11ef-8b54-975dcb6ac6ae:1-2211 |+------------------+----------+--------------+------------------+---------------------------------------------+1 row in set (0.00 sec)Conclusion
Canal is a powerful tool that provides real-time data synchronization and Change Data Capture capabilities. It is easy to set up and configure. Canal is a great alternative to Debezium and Kafka Connect and is worth checking out if you are looking for a reliable and efficient way to synchronize data between databases.